|
|
Planlegger du å lage en slik båt selv, fra bunn av - Eller som
under her som et byggesett - burde du ha god tid - Faktisk
veldig god tid - se under her - over 1300 timer ....
Legg
også merke til prisen på byggesettet : £700 er ca 6300 Norske
kroner ... |
|
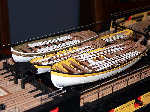
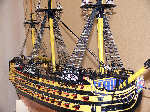
Building
The Jotika HMS Victory

At near
enough £700 this kit is a large investment but there is
several years work in it so across time it is a very cheap
way of spending your time. A friend of mine name of Brian,
asked if I could get him the HMS Victory kit when it came
out. Brian had just finished his first rigged ship model
and as luck would have it annual bonus payments made it a
possibility. As always there was a slight snag - due to
ever increasing research and information this kit has been
a couple of years in the making and, on Bonus day, it
still had not been issued, so we waited. Then waited some
more. Finally the announcement came and went - and in due
course the kit arrived.
We had
arranged to meet and swap the kit over in Bristol - but
when I tried to move it - it quickly became apparent that
that was not a real option. So Brian arranged to come and
collect it. Why? well the box is near 4 feet long by 1
foot square, and it is full to the brim with wood and
metal parts. Any way Brian took the kit home and started
to build. Hopefully we will follow the build on the site
with a few pictures as we go along - and get the tru story
behind building the kit.
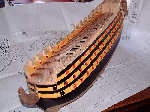
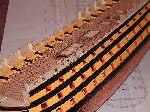
The frst
comment is that with the copious plans, build instructions
and parts, and even at £700 this kit looks and feels like
good value for money!! First is the keel and frames and
then the first layer of planking. The planks are long and
some require a fairly severe bend in them so they were
soaked in hot water to make them plyable before shaping
and fixing. Very straight forward except the only
container large enogh was the bath! I think Brian has now
invested in a plastic pipe. Any way he said that the build
to and including the first layer of planking was straight
forward but could only proceed relatively slowly - 4
planks an evening. He has also been looking at the
remaining build trying to figure how he can interleave
some of the more repetetive work (building canons) with
the more interesting stuff!
Picture
1 - up to first planking!
 |
64
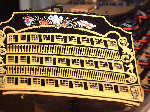
hours - Starting the rear galleries
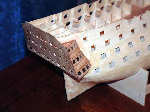
The
rear gallery has been started - as with all things
at this stage it looks very messy, filling sanding
and painting to do, so any errors will be covered
up. The main hull of course has another layer of
planks, and a layer of copper plates on most of it
(paint on the rest) which will cover a multitude
of sins - but you still need to take care as you
will always know that they are there!!
The
nine forward facing windows in the quarter gallery
are glazed, but it doesn't really show in this
photo. The gallery is made of 3 ply, so the grain
direction is quite critical. Bending parallel to
the grain is easy, bending across the grain is
almost impossible. The six layers in the quater
gallery are alternating grain directions, so it is
quite a job getting them aligned....
|
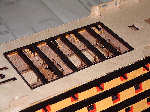
73
hours
This
is the middle deck planking. The lower gun deck is
not visible at all and this deck is actually only
visible at the bottom of a few stairwells. As most
of this decking will not be seen, its a good
opportunity to practice and perfect the techniques
- felt pen around the edges of each plank is too
thick and smudgy so I will not attempt this method
again (I'll try the black paper method).
The next photo (when I've taken it) will show the
second hull planking progressing. I'm Currently on
the 45th plank (90th if you count both sides!!),
but there are about another about another 20 to go....
|
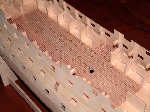
117
hours
The
second planking to the lower half of the hull is
finished. The rear half of the keel and the stern
post is finally glued on. With all the shaping and
sanding I was worried they would not fit, but it
was not too bad in the end. All of this nice
planking will be painted or buried under copper
plates, but after filling and sanding it will not
look so nice anyway!
|
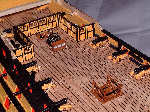
126
hours

The
camber beams to support the upper gun deck are now
in place. One last chance to look at the middle
gun deck planking as virtually none of this is
visible after the upper gun deck is in place
|
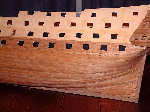
128
hours
The
upper gun deck and the inner bulwark patters are
in place. Although you can still see the middle
gun deck, the grating will cover most of these
holes. Quite a bit of shaping is required to
ensure the inner and outer gun ports line up.
|
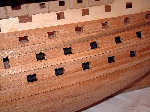
140
hours
The
upper gun deck and inner bulwarks are planked
(still using the felt pen method as a) I’m
getting better at it and b) most of this deck is
also hidden. The inner bulwarks will be painted
yellow ochre but I’m still deciding on the best
shade to do. The recommended colour is very pale
and washed out. Do I go for authenticity or
something that looks more dramatic/pretty? (the
latter I suspect).
|
165
hours
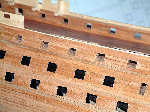
165
hours into the project and 16 of the gun ports are
lined - very fiddly indeed, and these are the easy
ones with inner and outer plates to glue onto -
just wait until I get to the lower ones, where the
lining is glued to just one 1mm edge.
|
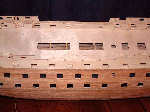
173hours
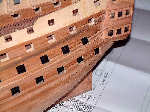
173
hours and the wales are in place. They are a bit
difficult to see in this photo, but look for the
planks that go at a different angle to the main
area (bending up towards the stern). Lots of
filling and sanding done, so things looking a
little tatty. I’ve just started the main lot of
gun port linings - 72 to do, that’s nearly 300
fiddly bits of wood to glue on (the next photo may
be some time away….)
|
191
hours
Happy
Christmas / Happy New Year - and another picture!!
Gun
port linings finished much sooner than I was
expecting (18 hours work). 72 gun ports lined in
all (4 per hour). After a while it becomes easy.
Initial fears of balancing a thin sliver of wood
on a 1mm vertical edge soon faded when I
discovered the three tricks - cut the wood a tiny
fraction too big and then you can wedge it into
position. Don’t use superglue, as you need to
adjust each piece to ensure they are sunk in to
the right depth and run parallel around all sides.
Do the two vertical edges, let the glue dry, then
do the top and bottom. If you try to do all sides
at once while the glue is still wet, you end up
knocking bits out of position (I still ended up
with quite a few parts that dropped inside the
hull never to see the light of day again…)
|
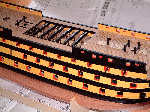
222-269
hours
222
hours, (31 hours of painting later), the Victory
looks quite colourful. Me and masking tape don’t
get on well and in the end all the painting was
done freehand. A wee bit wobbly in places but they
didn’t have masking tape in Nelson’s day after
all. The yellow I chose was a little deeper than
that recommended, but I took a bit of artistic
licence…
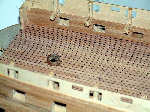
Another
36 hours on (258 hours into the build) and the two
and a half thousand copper plates are in place.
Just like laying bricks. A few tips (the second
side when on much easier than the first noting
these) – When gluing the first row take extra
care to line then up perfectly – subsequent
layers will line up much easier. If you make a
mistake and stick one on slightly out of place –
rip it off, it’s very difficult to work around a
wonky one (don't do this too many times though,
I'm not sure how many spare plates there are - I
still have to do the rudder)
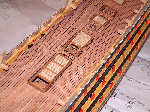
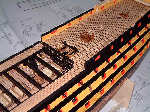
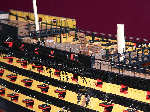
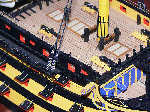
269
(and a half) hours in, and some detailed work at
last. Gratings and stairways, plus loads and loads
of little canon balls. Most of this upper gun deck
will be covered by the quarterdeck, but this deck
will be far more visible than the poor middle gun
deck (you can just see a bit at the bottom of the
stairway, lower left of the photo. The loose
threads are the companionway guard rails and will
be fixed to stanchions and pillars at a much later
date. Next job is the 30 canons on the upper gun
deck...
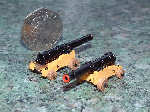
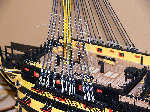
316
hours (47 hours since the last photo) and all 30
of the upper gun deck canons are complete. Each
one is built in 18 stages over eight days, so
quite a lengthy conveyer belt going most of the
time. Lots of tiny pieces (especially those little
rings) so heavy use was made of the old magnifying
glass. Next set of work is rigging the canons –
more work under a magnifying glass, and my fingers
are just that little bit too big. I’ve decided
that the rigging is so fiddly, I will not be doing
the canons that are completely hidden under the
quarter deck (about half of them)
|
|
|
347
hours
347
hours in, now passed the six months elapsed time (7
months 25 days). The cannons on the upper gun deck
are finished and I think I could make one
blindfolded. Four additional stages to the rigging
meant an elapsed time of 12 days to make a cannon (had
I done all 30, one at a time, it would have taken a
year!). Rigging was a bit fiddly, but got the hang
of it near the end – hopefully the quarterdeck
cannons will be neater. I only rigged 14 in the end,
as the other 16 are well and truly hidden. Now its
on with more pillars and stairs up to the
quarterdeck…
|
361
hours
8
months (less one day) elapsed, and 361 hours in. The
quarterdeck is on, and having spent just over 100
hours on the upper gun deck, this is all you can see!!
What makes matters worse is that later on (next year
probably), the four ship’s boats will be placed on
top of this area. Still, I know all the detail is
there, and the ship’s boats will cover up some of
my awful knot tying (I must get a book or something
to help). The stairway rigging and pillars all had
to be done after the skid beams were put on. This
makes it a bit like keyhole surgery, and most of
this work has to be done with tweezers. There were a
couple of heart stopping moments when I dropped two
of the pillars – yes, they bounced down the
stairways into the middle gun deck. I managed to get
one back up the stairs and the other out through a
gun port (phew)
|
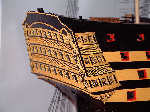
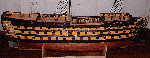
421
hours.
At
last, all the outer hull planking is on and painted.
The inner lining and gun ports are also finished
apart from the poop deck. This is now the start of
the sticky-up bits on the deck such as the galley
stove chimney – they all look very nice but will
be prone to knocks (fingers crossed!)
|
438
hours.
More
sticky-up bits to accidentally knock off. The belfry,
the quarterdeck barricade, waist ladders down to the
gun deck, the main companionway staircase and
balusters and the companionway to the admirals
dining cabin are now in place. One calamity occurred
doing this. The main companionway ladder is the only
one without rope handrails, which are very handy for
lowering the ladders into place. This last ladder is
the only one that is fully visible and I dropped it
into the stair well. Not only did it slip down to
the upper gun deck, but it also slid down the next
staircase to the middle gun deck – completely out
of reach and in total darkness. D’oh! As Homer
would say. After much fiddling with tweezers and a
torch, I had to bight the bullet and remove the
other ladder to the middle gun deck so I could
retrieve the missing ladder (successfully) .
I also tripped over and nearly dropped the model, so
I’m stopping for today…
|
498
hours.
things
are starting to look pretty at last. 14 more cannons
completed and I’m finally getting the hang of the
rigging. I used a little jig rather than tying all
the lines in situ – a vast improvement. The
screens behind the wheel maybe should have been just
plain wood finish (as on the current Victory décor),
but I couldn’t resist the yellow and black
panelling (as in the old Victory guide books), which
I think looks so much more interesting (if less
historically accurate). The windows are glazed but
it doesn’t show up in the photo. Next photo (in a
week or so) will be the beakhead which is nearing
the completion of the first stage (blue paint make
such a change from yellow and black)
|
518
hours

(I’ve
past the historic 500 hour mark) and the beakhead is
started. Relatively simple stage (especially
compared to the next bit). My first taste of gun
port lids, not too bad but still around a hundred
left to do. Bending the mouldings to fit around the
roundhouses was a bit tricky, but nothing that a
little trial and error wouldn’t cure. The two
large cannons were the very last two to be done. You
can just see the ship’s bell at the top of the
picture.
|
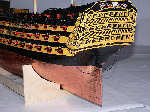
560
hours
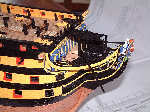
.....
and the bow is just about finished (just a little
touching up here and there). Lots of curvy bits that
were very tricky to line up – all the curves are
three dimensional so while it’s easy to align
things up-down and left-right, you have to keep
checking the in-out curve as well. Not too many
photos showing how the bows should look and they all
seem to differ a little, but hopefully it’s about
right. Notice there are lots of sticking-out bits
now (the yellow cat-heads and the black boomkins)
– great care will be needed taking the model in
and out of the cabinet now! (yes, I’ve knocked one
already). The figurehead was hard on the eyes – I
needed a very large magnifying glass and a very very
small brush (00). The actual figurehead has huge
amounts of detail that is just not possible in a
casting this size, so some “approximation” has
to be done. From a distance however, it does not
look too bad.
|
594
hours
.......
and more importantly, I’ve just past the first
anniversary of starting – its been one year and
three days since I glued the keel together. The poop
deck is just about finished, the deck planking went
really well and looks much better than previous
attempts. Unfortunately, looking much better means
it does not match the other decks so well – D’oh!
Lots of fiddly work on the poop deck – 52 little
windows in the skylight and 21 little buckets to fix
handles to.
Next step – the stern – lots more detailed
painting – time to get a new brush and visit the
opticians…
|
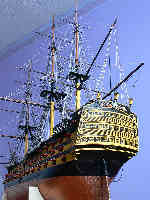
630
hours
..
and the stern gallery is nearly finished. This stage
was probably the most satisfying so far. Although it
looks very fiddly to do it was not too bad. The
etched brass fittings are very detailed and because
they can be all painted separately there is very
little to paint in situ. The most difficult bit was
actually mitring the brass mouldings that go around
the base, which has to be bent and bowed in all
sorts of directions. These moulding have to be
joined at a little less than 90 degrees, and the
whole thing slopes backwards as well. Good old
milliput filled the gaps though! The crisp finish to
the castings helps with the painting as well and I
think the end result looks rather good (if I do say
so myself). I’m still looking for a good reference
picture of the stern trophy of arms before painting,
I may go down to Portsmouth soon….
|
|
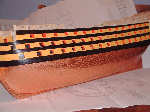
On
Quite another tack - Dave Bevan has told us of his
efforts with another makers kit and particularly the
copper plateing. After trying for some time with the
supplied plates he saw some copper tape for sale in
varying sizes. The tape and some wheels from a cheap
Argos alarm clock have proved to give him the answer
to the plates and the nail impressions. Dave did
supply pictures but some cameras just cannot cope
with real close up work and they were a bit blurred
to reproduce. Thanks Dave and perhaps we can have a
picture of the whole model sometime.
|
|
690
hours
I
finally visited the Victory at Portsmouth to get
some photos. There was scaffolding and plastic
sheeting over the stern, but luckily the trophy of
arms was still visible. The 105 photos I took was
probably a little bit over the top, but the trophy
of arms at the stern is now in place (690 hours
into the build). I’ve also started the channels,
gun hatch lids and mouldings (the blurry bits to
the right). A new (sharper) photo will be posted
soon (of the full side view).
|
716
hours
This
stage should be channels, and then gun hatches,
followed by the mouldings but I found it easier to
do all three at once, as hinted at in the
instructions. After 72 hours (two months) I’ve
done about 1/2 of the work (one side), so at this
rate I won’t start the rudder until the New Year.
This part is very fiddly (especially the chain
plates) but the end result is very effective, with
so much fine detail. Photos are a bit of a problem
as most of the detail is black on black. I’ve
temporarily removed the boomkins in the bow (see
560 hour photo), as they were rather delicate And
no matter how careful I was taking the Victory in
and out of the display case, they kept hitting the
sides and one even snapped in half (nothing a bit
of super glue couldn’t fix). I’m not even
thinking about putting the stern lanterns on until
I get a bigger display case (if I ever find one
that’s 5 foot wide!!)
|
779
hours
The
second side of gun port lids, channels and chain
plates and mouldings are all finished. The rudder
is also in place and I was very pleased to find I
had enough copper plates! It only took me ten
hours of work after finishing all the gun port
lids before I knocked one out of position. It only
bent a bit, as they are all secured with two brass
rods but the ropes had to be re-done. I guess this
won’t be the last one.
|
811
hours....
.......and
I’ve reached the momentous position of having
finished the first part of the construction - the
first of the two instruction manuals. The hull is
completely done, and it’s on with the masts next.
The final part of the construction was all the
ropes across the hammock cranes, handrails, and
the poop deck barricade (plus the four anchors
which are attached much later). Actually, I’ve
started the ship’s boats next, as they will fit
in the display case – unlike the masts!!
|
896
hours....
The
instructions say the ship’s boats will take
about two weeks of evening work. Well, I guess I
must be a bit slow as it took me about 85 hours (that’s
about 6 hours per evening over two weeks) It
actually took just over two months, but it was fun.
Each boat is a little miniature double planked
creation. Apart from the size, the main difference
between them and the full sized ship is that the
bulkheads have to be removed and your handiwork is
“exposed” on the inside. The instructions show
the boats with just a few oars inside, then they
tell you they actually had 4, 8, 14 and 16 oars
altogether so it ends up looking very crowded. I
think I could have arranged them a little better
though. You need to make sure make sure you keep
the planks tight into the bulkheads as there is a
tendency for them to splay out a little. The boats
are a very tight fit when placed in position, with
less than a millimetre to spare, so it’s no good
having them too big.
There is disappointingly little of the upper gun
deck visible once the boats are in place - perhaps
I’ll do a diorama with the boats at sea! Plenty
of time to make up my mind - they don't get
secured in place until after the rigging (a very
long time away!)
|
910
hours
The
masts are started (well the bowsprit anyway). I
think this is the first time when carpentry skills
(or lack of them) become more important than model
making skills. The angled joint to fit the cap on
was a real challenge and I got it perfect first
time – just a pity it was a mirror image of what
it should have been. The second attempt was not
quite so good unfortunately, but I couldn’t face
making a third one and it was to be painted black
anyway. It became obvious during the bowsprit
construction that just sanding and filing would
not be good enough and a lathe was going to be
worth investing in. I’ve now got a miniature one
for doing all the masts and yards and it’s so
much easier (although lathing an 8” length of
6mm dowel down to 2mm one end is a bit hair
raising!). ( you can do this in an electric drill
- it's what I used for a number of years. Allan)
|
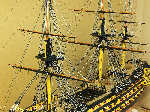
937
hours

I’m
nearly finished on the foremast. The photo shows
two stages, the one after painting is difficult to
photograph (all the detail being black), and so
the left hand one is before painting. I chose to
do the banding in plastic-card rather than paper.
The card is stronger and (more importantly) comes
pre cut in perfect strips (Ok, cheating a bit). If
you’re making the Victory, and haven’t got to
this stage yet, I found the topmast caps (fore and
main) needed splitting to fit over the topmasts (the
mizzen topmast cap comes pre split). The caps
split very easily as they are solid wood not ply.
They glue back together again with no join showing
at all.
|
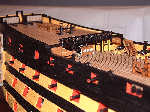
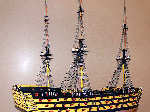
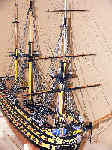
1000
hours
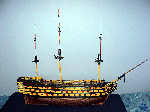
At
11:00am on Saturday the 25th June I completed my
1,000th hour on the Victory, nearly 2 years after
starting – quite a moment. The picture here
shows progress at around 990 hours (I’ve started
on the yards since then). The masts are just
placed in their holes, so not fully aligned in the
photo. With the masts in place, the scale and size
of the ship really comes home and I realise
carrying it to and from a cabinet for the final
stages of the build will be fun – you have to
bend quite low to get under the door frame for
example! Guess I will have to think about a
dedicated room (I’m sure my wife would like to
get me out of the kitchen!!)
|
1044
hours

,
and I’m putting the finishing touches to the
yards. This is the main yard and is surprisingly
complex to make – there are some 69 parts making
up just this one yard – not including all the
threads. The lathe has proved invaluable.
|
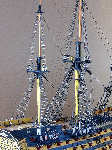
1054
hours
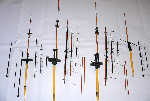
I’ve
finished all the yards. Here they are, laid out in
all their glory, alongside the masts, bowsprit,
booms, gaff and other nautical bits and bobs. The
next step is the glue the masts in place. Oh dear,
now I really will have to look for a new home for
the Victory, as it’s about to outgrow its
current display case...
|
1055
hours

Work
has finally started again. After the long delay
looking for a new cabinet to keep the Victory in (the
old one wasn’t big enough for the masts) I built
one. A 5 sided glass case will be the final choice,
but totally impractical during the build phase.
Display cabinets were too expensive, so I’ve
gone for a temporary DIY job – Four bits of
contiboard, a big bit of hardboard, and three
pieces of Perspex to keep the dust out. Its nearly
5 foot by 4 foot by 2 foot – a bit unwieldy
getting it up the stairs, but I now have a Victory
room (or is it the Trafalgar room?) to work in.
The masts are glued in place and I’m now adding
the pendants. Next photo will be the start of the
shrouds…
|
1065
hours
....
another momentous point - the start of the rigging
- first two shrouds in place on the foremast -
quite tricky, as there are so many things to catch
your fingers on - better get used to it though. I
used a jig (of bent brass wire) to get the spacing
right between the dead-eyes - much easier now.
|
1111
hours
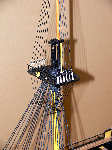
I’m
well into the rigging. The shrouds are almost
finished, and this shot shows the main mast lower
shrouds, lower futtock shrouds, carthapins,
topmast shrouds, lanyards etc. If you’re making
this model (and haven’t got to this bit yet) pay
attention to the instructions for the carthapins
(I didn’t, and they are not quite right – they
shouldn’t all line up with the futtock shrouds.
Its quite tricky getting all the tensions to all
balance up, but the secret seems to be - don’t
over tighten any of the ropes. I did over tighten
one, and the deadeye snapped off and shot across
the room into the landing (the rest were a lot
better!)
|
1120
hours
1120
hours and all the shrouds are done. Next it’s on
to the ratlines. Several thousand knots to do and
my eyes and fingers will only allow about one hour
at a time (about 100 knots). The picture shows
work-in-progress – the loose ends are trimmed
when the glue has dried
|
1126
hours

Not
long since the last update. This photo shows one
side of one mast. The biggest problem is avoiding
the rest of the model while my fingers are
concentrating on tying the knots. A few close
encounters with the gun ports and fences, but no
serious damage. I’ve made a little ruler showing
the distance between ratlines on a piece of
plastic-card – essential when gauging the last
six ratlines which have to be shorter than the
rest. I’m currently at 1148 hours (but the
rigging is just more of the same) – Next photo
will be when all the ratlines are done –
hopefully before Christmas (I'm around 5/6 of the
way through)
|
|
1153
hours
..................and
as predicted, I’ve finished the ratlines before
Christmas (on Christmas Eve!). It only took just
over 37 hours, which for 2,777 knots is around 74
per hour. The more observant of you will notice
2,777 knots does not divide by 2. Either I’ve
miscounted, or the port side does not match the
starboard (I suspect the latter). Looking forward
now to adding the bowsprit – although once added,
the model will be much less easy to move in and
out of the cabinet…
|
1172
hours
–
about 20 hours work over the Christmas holiday.
The bowsprit is on, the mizzen mast stays are done
and the fiddliest bit – the main stay, complete
with snaking was finished tonight (the end of the
holiday). Tying the snaking onto the main stays,
in-between the foremast shrouds was very fiddly
– my hands are too big! The hardest part of the
rigging seems to be avoiding hitting other bits
off the model – the jack staff was the main
casualty today – I knocked it off twice (I’m
leaving it off for a while now...)
|
1195
hours
...
and well into the stays. Photo shows the stays and
preventer stays going from mast to mast and the
backstays going from the masts to the channels at
the base of the shrouds. It’s starting to get a
bit like a spider’s web. Had another major
catastrophe during this stage – snapped the end
of the bowsprit off while moving the ship around
to get to the other side. Managed to repair the
damage without needing to go back and replace/redo
bits (hope it holds). Many people have already
asked to see the photo of the damage – and the
answer was no, I didn’t take a photo...
|
1211
hours

All
the stays are finished (and no more casualties!).
I’ve just started putting the first of the yards
on – these will make the model a lot deeper and
hence harder to move around (... I'm preparing for
another calamity). The next photo will however,
start to look close to the final thing…
|
1223
hours
......
and the first set of yards is in place on the
foremast. I have now actually fitted all nine
yards, but until the next stage of the rigging,
many of them hang at odd angles and look somewhat
silly (hence no photo for that stage!). The more
observant among you will notice the lack of the
jack staff. It made a brief appearance in the last
photo, but got knocked off yet again and lost in
the dark recesses of the Victory room. Making a
new one will be easy, but I really am going to
delay the fitting until the last possible moment
this time!
|
1256
hours
(Sorry
- I have been very tardy in putting this update
from Brian up. )
More and more and more threads. All the yards are
in place, and held by the lifts (diagonal threads).
It is getting more and more difficult to get to
various pats of the ship to do the rigging (eg the
base of the mast) and I am only about half way
through the rigging - I'll have to go on a diet to
get my fingers thinner. Two pairs of tweezers are
essential, as are very slow movements...(So time
to introduce the push and pull hooks. I used to
use these when I worked on adding machines in
order to pet springs in place. We used to make
them from silver steel ground to a long point then
bent carefully bent into a hook shape for pulling
with or a half hook and then bent back on itself
so that there is a dip for pushing with. Then heat
to red and quench with water to harden. Clean it
up and heat again away from the tip until the
colour runs down and the tip is light straw going
to blue - then quench - this makes it springy. You
can just about make something out of brass wire
but not terribly good though effective)
1294
hours
and
the stern is complete. In fact I realise that
there are only three more pages left in the
instruction manual and the whole project is only
weeks (if not days) away from being finished –
scary! Only a couple of major calamites in this
session, including a snapped piece of rigging (after
I accidentally knocked the main yard). It was a
very odd breakage, much of the rigging went slack
and it took me several minutes of puzzlement
before I spotted the offending break. Luckily it
was in an accessible area and repair was quite
easy (phew)
|
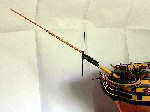
1321
hours
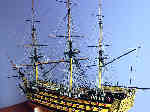
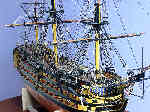
On
Sunday April 30th 2006, at 8:35am I glued on the
jack staff again (for about the fourth time). That
was it, the final piece – HMS Victory is
finished ! 1321 hours in total, spread over 2
years, 8 months and 25 days – that’s 999 days
(I should have stretched it out for one more day!).
I have to say a big thank-you to JoTiKa for making
an absolutely fantastic kit, which was a joy to
make (all 79,260 minutes of it ....or 55 days 4
hours accumulated work ...ed). Also, thanks to
Allan for posting the photos here, and my wife for
putting up with the mess ! Now what will my next
ship model be?……Brian - it has been an
absolute pleasure - we would love to follow your
next build
|
|
|
|
Alle
bilder på disse sider er beskyttet ihht. opphavrett.
|
|
|
| Noen
av de andre båtene og skipene : |
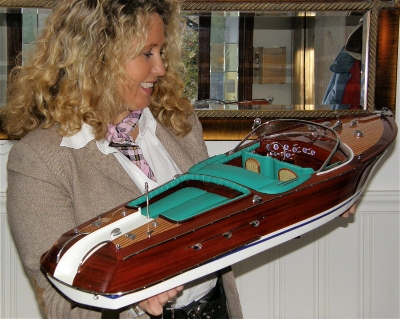 |
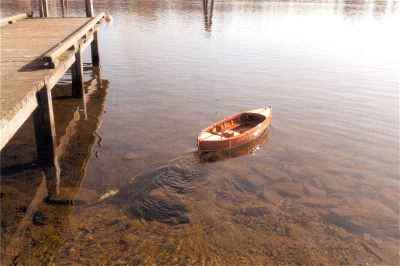
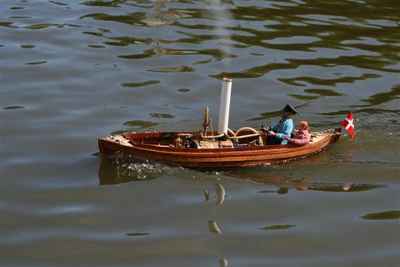
INSPIRASJON :
Under er noen tilbakemeldinger fra våre kunder, som har bygget om
våre modeller, bl.a. til fjernstyring med elektromotor og til og
med live steam. |
SNEKKE
MED ELEKTROMOTOR OG RC
 |
SNEKKE
MED DAMPKJELE OG RC - LIVE STEAM
|
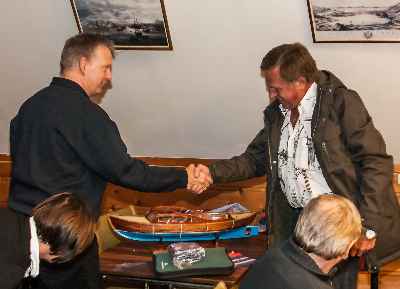
KNBF
overrekker snekke til Draugen Motorbåtforening i
forbindelse med 80 års jubileum.
 |
|
|
|
|
|
|
|
|
|